Nothing quite beats a chocolate cake, especially when that cake is rich, moist, and full of deep chocolate flavor. Yum.
I don’t frequently eat cake, or sweets in general for that matter, so when I do indulge, I want it to be outstanding. I want it to be worth it. Unfortunately, too often I’m met with a disappointingly dry, crumbly cake, with cloyingly sweet icing and mediocre flavor. Certainly not outstanding, and definitely not worth it. Surprisingly, such cakes often come from commercial bakeries—the very folks who are supposed to be giving us quality cake! Instead, their middling creations are defining for many people what “good cake” tastes like. It’s sad.
Dessert disappointments often result from a series of small errors in the process or recipe. Cakes are overbaked, or they’re jammed with preservatives, enhancers, or other fake ingredients. They’re disproportioned or marred with odd ingredient substitutions. (Shortening in place of buttercream? Really?! I can’t believe how many recipes I’ve seen suggest this.) And then there’s the sugar overload. Some recipes call for literally cups of powdered sugar for a cake that feeds only eight to ten people. Sure, powdered sugar doesn’t measure out quite the same as granulated, but, still, that is a shocking amount.
A good cake does not need enhancers, hydrogenated fats, artificial flavorings, or copious amounts of sugar to be delicious and moist. All it really needs is quality, real-food ingredients, a watchful eye, and a few small tricks of the trade that add up to big results.
Because of lackluster outcomes and the notion that baking a good cake is difficult, many home cooks shy away from making cake themselves, heading to their nearest bakery instead. I get it. I outsource on occasion too, and I’m a former pastry chef. But let me tell you, I’m let down so often that I almost always wish I’d spent the time to make it myself.
What I want to do in this post is give you a foundational cake and a foundational icing that you can use as a base for all manners of future cake and flavoring combinations. I’ve been using the recipe here for about twenty-five years now, and it always delivers. Over time I’ve tweaked it to suit my more health-minded lifestyle, minimizing the amount of sweetener and refined ingredients, yet it still produces amazing results. And I’ve dotted the recipe with helpful tips, which I’ve gleaned over my time in bakeries, that make a huge difference. With this recipe in your arsenal, you can bake a moist, delicious cake each and every time.
Buttercream is something I started using fairly recently, and it has become my go-to for all kinds of dessert recipes. It’s luscious and silky, with an almost custard-like flavor, and it requires just a handful of real-food ingredients to make. And it spreads soooo easily. It’s also versatile, adapting to many flavoring additions, such as chocolate in this case.
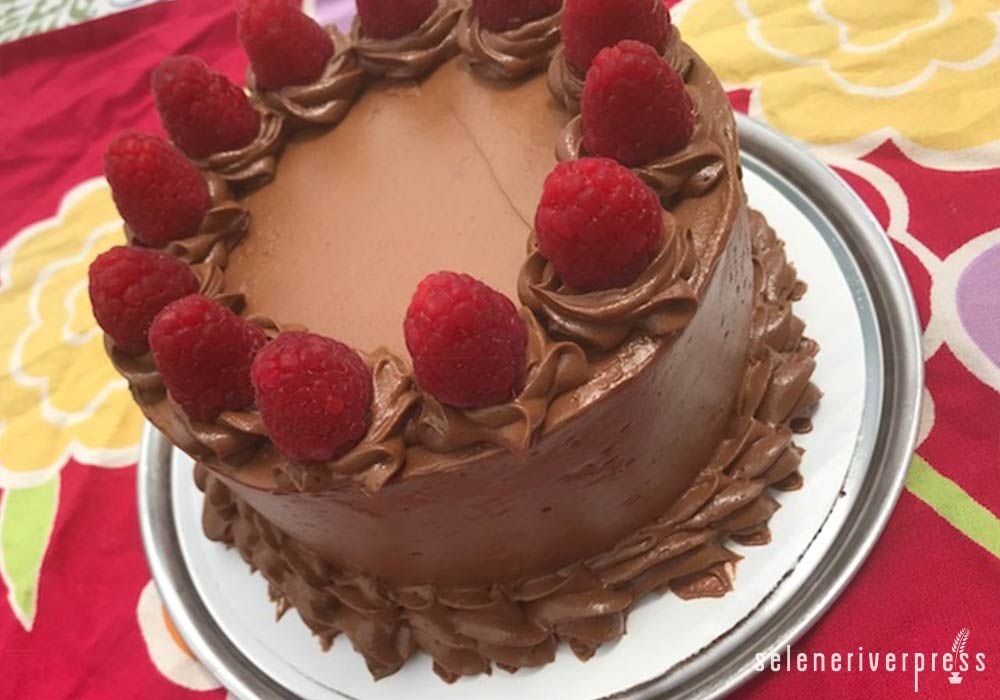
I love to fill cakes with whipped cream, especially in the summer. It’s less heavy and overpowering than using all icing throughout the cake layers. It’s like having a dollop of fresh cream on your dessert. J Fresh berries add another refreshing element. Since raspberries are plentiful and full of flavor at this time of year—and a favorite chocolate pairing for many people—they seemed most suitable here. That said, they’re not mandatory. Omit them or replace them with another fruit of your choice if you prefer.
For the best results, prepare the cake a day before and refrigerate it overnight, and prepare the buttercream icing the day of. You can make the icing beforehand, but you if you do, you will need to bring it back to room temperature and possibly rewhip it for optimal “spreadability.” Also, if you want to decrease your hands-on time, simply make the cake in a baking dish instead (9″ x 13″ works well), ice the top, and serve the whipped cream and berries on the side.
Chocolate Chiffon Cake with French Buttercream
Tip: Do not skip the soaking step when you assemble the cake! It adds additional flavor and moisture to even the driest of cakes and, in my opinion, is the one step that no cake maker can afford to omit.
Makes: One 8-inch round cake, enough to feed 10–12 people
Prep time: 20 minutes for cake and 20–30 minutes for buttercream, plus additional time for assembly and icingCook time: 50–60 minutes for cake, 20 minutes for icing, plus time to chill
Equipment:
8-inch cake pan (springform or standard; light-colored pans produce the best results)
Parchment paper
Stand mixer or handheld electric mixer
Candy thermometer
Pastry brush
Cake board or platter
Palette knife (or spatula)
Piping bag with star tip (optional, for decorating)
Ingredients
For the cake:
¾ cup melted butter, ghee, coconut oil, or neutral-flavored oil, plus more for lining cake pan
4 egg yolks
½ cup water
1 tablespoon vanilla extract
1 cup einkorn flour, whole wheat pastry flour, finely ground nut flour, or other light-textured flour of choice, or a combination of these to equal 1 cup
1 cup coconut palm sugar
¾ cup unsweetened cocoa powder
2 teaspoons baking powder
1 teaspoon baking soda
½ teaspoon salt
6 egg whites, room temperature
For the buttercream:
1 cup unsalted butter
½ cup coconut palm sugar
3 tablespoon water
5 large egg yolks, room temperature
1 pinch salt
1 teaspoon vanilla extract
4 ounces unsweetened chocolate, melted and cooled to room temperature
For the cake assembly:
½ cup warm brewed coffee or warm water
1 dash plus 1 teaspoon plus vanilla extract, separated
Coconut sugar, maple syrup, liquid stevia, or other sweetener of your choice
1½ cups heavy cream
2 cups raspberries (optional)
Instructions
Prepare the cake:
- Preheat the oven to 350˚F. Using the cake pan as reference, cut a round piece of parchment paper to fit the bottom of the pan as well as a couple of strips wide enough to cover the sides of the pan. Then brush the bottom and sides of the pan with a tiny bit of oil or melted butter and line them with the parchment paper. This simple step makes removing the baked cake from the pan easy and produces a nicer and more uniform cake overall. Plus it keeps the cake from coming in contact with the cake pan, which is typically made of aluminum. Set pan aside.
- Place 4 egg yolks in a medium-sized bowl. Add melted butter, water, and vanilla. Whisk and set aside. In a separate, large bowl, stir together the flour, coconut sugar, cocoa powder, baking powder, baking soda, and salt. Add the egg yolk mixture to the dry mixture and stir the batter until no lumps remain. Set aside.
- Place egg whites in the bowl of a stand mixer (or a large bowl if using a handheld electric mixer). Whip the whites to stiff peaks. Be sure there are no yolks in your whites and that the bowl for the whites is impeccably clean; otherwise they won’t whip properly. Carefully stir about one-third of the whites into the batter to loosen it up. Then gently fold the remining whites into the batter. Be gentle, so that you don’t deflate the whites too much.
- Pour batter into prepared pan and bake in center rack of oven until center of cake springs back and a toothpick inserted into it comes out clean but moist, about 40–60 minutes. (Check the cake at 40 minutes; then cook additionally, if necessary, in 5–10-minute increments until done.) The variability in cooking time stems from the type of pan you use. Dark pans cook faster than light-colored pans; heavy pans cook differently than lightweight pans. Altitude and variance among home ovens also affect the cooking time.
- When the cake is done, remove it from the oven and allow it to cool, in the pan, on a rack for about 30 minutes. Then flip the pan, turn the cake out onto the cooling rack, and allow it to continue to cool. When completely cooled, wrap it tightly and refrigerate it overnight.
Prepare the buttercream:
Note: This recipe makes enough buttercream to frost an 8-inch round cake. If you want to fill the cake layers with the buttercream as well (instead of with whipped cream), then simply double the ingredients.
- Cut the butter into large pieces and let them stand on the counter until they come to room temperature. In a small pot, combine coconut sugar and water. Place candy thermometer in mixture and bring mixture to a boil over medium heat. Reduce heat and simmer until temperature reaches “soft-ball” stage (238˚F), approximately 10–15 minutes.
- While syrup simmers, place 5 egg yolks and salt into bowl of stand mixer (or stainless steel bowl if using a handheld electric mixer). Whip yolks over high speed until pale and thick.
- When syrup reaches temperature, slowly pour hot syrup into yolks, with mixer running on low speed. Once all syrup is incorporated, increase mixer speed to high and whip until mixture cools to room temperature, about 5–10 minutes.
- Reduce mixing speed slightly and add butter in pieces, while mixer runs, waiting until first piece is fully incorporated before adding the next. Continue this until all the butter has been added; then increase speed and whip until fluffy. The mixture may separate, but it will come back together with time and mixing.
- Add vanilla extract and cooled melted chocolate to buttercream and whip until thoroughly combined. (Buttercream may also be used without the chocolate for a plain vanilla.) Keep buttercream at room temperature if using immediately, or refrigerate it for later use. If storing for later, be sure to bring it back to room temperature and whip it again before use.
Assemble the cake:
- Combine coffee or warm water with dash of vanilla extract. (I find coffee in particular enhances the depth of chocolate flavor.) Stir in a dash of coconut sugar or maple syrup or a drop of liquid stevia. Set aside.
- Whip cream to stiff peaks; add 1 teaspoon vanilla extract and lightly sweeten with stevia or other sweetener, if desired (highly recommended).
- Place the prepared, chilled cake onto cake board or platter. Slice it horizontally into three equal-width layers. Remove the top two layers and set aside. Using a pastry brush, lightly brush the coffee or water mixture onto the bottom layer of cake. (Seriously, this makes all the difference!) Spread one-third of the whipped cream onto the layer; then top it with about half the berries in a single layer. Leave a margin around the edge so that the filling doesn’t come out the sides of the cake when you place the next layer on. Spread just a touch of whipped cream onto the berries to help the next layer stick.
- Place center layer of cake atop berries and whipped cream. Repeat the steps above for this layer; then top with final layer of cake. Lightly brush the top of the cake with the coffee or water mixture.
- Using room-temperature, freshly-whipped buttercream, carefully ice the top and sides of the cake with a palette knife or spatula until fully covered. Be especially careful not to put too much weight or pressure on the top of the cake while you ice it, or the filling will come out the sides. Decorate the cake with icing decorations, fresh berries, or flowers, or leave it as is. Serve immediately or, for best results, refrigerate for 1 hour to let cake set. Remove chilled cake from fridge about 15 minutes before serving.
Image from Briana Goodall.
Does this recipe make 1 or 2, 8″ cakes? The recipe speaks of filling the layers with the buttercream so I would like to know if I need to double the cake recipe and use one buttercream recipe?
Hi Robyn,
The cake makes 1 – 8″ cake, which is then sliced into three layers (step 3). If you would prefer, you may make 2-3 thinner 8″ cakes, and simply stack atop each other, though you will need to reduce the baking times