In my former life as a pastry chef at the bakery where I honed my craft, Easter weekend was one of our busiest times of the year. We carefully mapped out our prep work for the week to maximize production and minimize a nervous breakdown come Good Friday. We started our “day” around midnight, pumping out hot cross buns, croissants, challah bread, and special desserts for the holiday. We felt a sweet sigh of relief come Saturday afternoon as we filled the last order. After the rush, we were more than ready for a few days of downtime.
I was the croissant girl for the earliest part of the day, before turning my attention toward colorful fruit tarts, delicate pastries, and beautifully decorated cakes. All of our loyal customers had their favorites, which they faithfully ordered every year. But without fail, our biggest seller was my cheesecake. It was requested in all manner of flavors throughout the year, but springtime called for bright, fresh citrus and other fruits, fragrant vanilla, and delicate floral notes.
Many home cooks are wary of cheesecake, believing it’s too much of a challenge to master. There’s definitely something to be said for finding that sweet spot, but the true secret of the perfect cheesecake is defying your preconceived idea of when it’s finished cooking. When it comes to most less-than-great cheesecakes (I don’t think there’s such a thing as a bad cheesecake), the biggest downfall is overcooking. This results in a cracked top and a somewhat crumbly texture. Baking until it’s just set, with a slight jiggle in the center, is the key to a creamy texture.
There are numerous tricks to securing a smooth, velvety custard. You can give it a long, low bake, or you can turn the oven off part way through the bake cycle and leave it in for hours afterwards. Though both of these techniques work, they can be time consuming. One of my secrets to achieving a luscious texture and avoiding the dreaded crack is to supplement the cheesecake with a second, briefly baked layer made of nothing more than lightly sweetened sour cream and vanilla. This additional layer plays double duty. First, it creates a smooth, white finish, free of cracks, on the top of your cake. Second, it adds another flavor and textural dimension. In my opinion this contributes extra lightness and tang that complements the rich cheesecake custard layer perfectly!
This year, I’ve taken my experimentation with ingredient substitutions into the realm of my famous cheesecake. I’ve replaced the usual graham cracker crust with ground, toasted nuts and spent some time working with inositol for a sweetener, which, I’m pleased to announce, worked beautifully!
The updated version is an appropriate alternative for those who observe Passover. It’s also suitable if you can’t or don’t eat wheat (or any grains for that matter). And the sweetener substitution makes it a great choice if you’re looking to reduce your sugar or carbohydrate intake, or if you’re living with diabetes.
If inositol is unavailable, you may use your favorite sweetener to taste. Honey has a fairly discernable flavor and will add background notes of whatever blossoms it comes from. Other good options are maple syrup, coconut sap, stevia, coconut sugar, or unrefined cane sugar (sucanat). Each option provides its own distinct flavor. I find maple syrup, coconut sap, and stevia to be the most neutral in flavor, but be extremely sparing if using stevia as it’s incredibly sweet. Coconut sugar and sucanat both lend caramel notes, especially the sucanat, which is also a little molasses-y. The coconut sugar and sucanat also lend a golden caramel color to the custard.
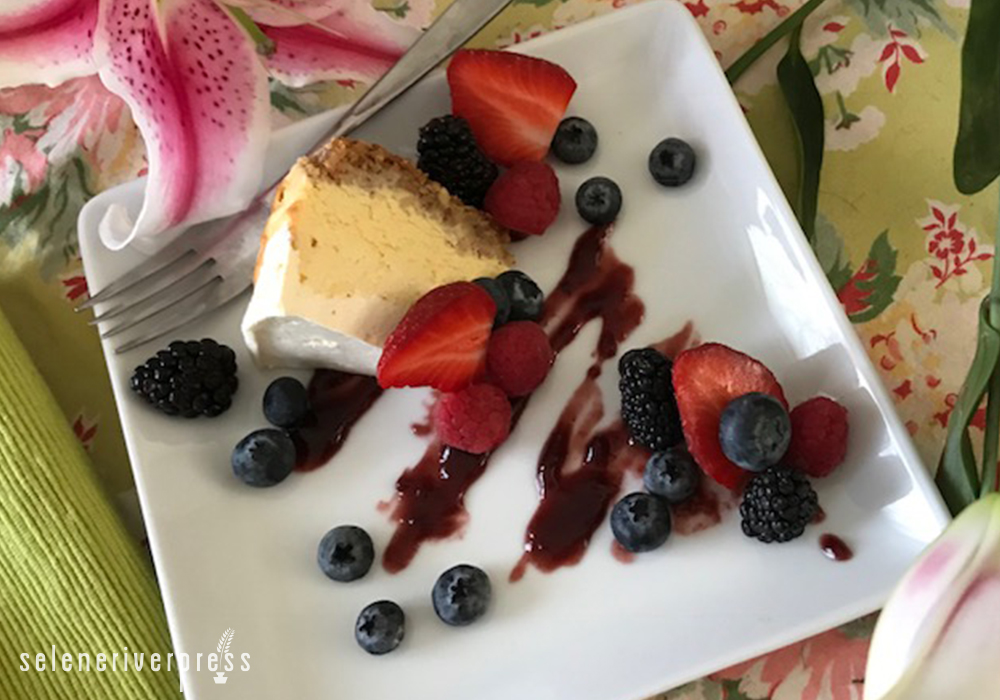
This basic recipe can be flavored and garnished with almost anything you like. At this time of year, I prefer fresh, fruity flavors. Bright citrus and an assortment of berries are especially lovely and appropriate. Additional berries pureed into a sauce adds a further unique element. Feel free to use whatever beautiful, vibrant fruit is to your liking. This is a perfect make-ahead dessert as it’s best made one day in advance.
Creamy Lemon Cheesecake
Makes 1 (8-inch) cheesecake
Prep time: 20 minutes
Cook time: Approximately 1½ hours, plus time to chill
Ingredients
For the crust:
2¼ cups ground nuts (I prefer pecans, almonds, or hazelnuts)
½ cup butter, melted
Inositol, or other sweetener of choice, to taste
For the cheesecake-custard layer:
1 lb. cream cheese
Inositol, or other sweetener of choice, to taste (I used about ½ cup)
4 eggs
2 teaspoons vanilla extract
2 tablespoons lemon juice
1 tablespoon lemon zest
⅔ cup whole milk
For the sour cream layer:
2 cups sour cream
Inositol, or other sweetener of choice, to taste
1 teaspoon vanilla
For the garnish (optional):
Fresh berries or other fruits
Berry puree
Whipped cream
Special equipment: 8-inch springform pan, parchment paper, and cake board or large platter
Instructions
- Preheat oven to 350°F. Using base of springform pan as a guide, cut out a round of parchment paper. Next, cut two wide strips of parchment paper (wide enough to line side of pan). Brush pan with a tiny bit of melted butter or oil, then line bottom and sides with the parchment paper. Set aside.
- Toss ground nuts with melted butter and just enough inositol (or other sweetener of choice) to taste. Press nut mixture into an even layer in the base of the prepared pan. Bake until fragrant, about 10 minutes. Set aside.
- Prepare the filling: Using a stand mixer or handheld mixer, beat cream cheese until very soft, scraping down sides of bowl with a spatula to be sure no lumps remain. Add sweetener of your choice to taste. Beat mixture, scraping bowl again, until combined. Add eggs one at a time, mixing on low speed until all eggs are incorporated. (Try not to beat too much air into the mixture at this point.) Add vanilla, lemon juice, zest, and milk. If you’re not squeamish of raw eggs, taste and add more sweetener if you like. Gently pour custard over nut crust. Bake until puffed but still slightly jiggly in the center, approximately 35–45 minutes. Remove from oven and cool on a rack for about 20 minutes.
- Prepare sour cream layer: Whisk together sour cream, sweetener, and vanilla. Spoon atop cheesecake, being careful not to dollop it too heavily in the center (otherwise the weight can cause the top to cave in). Spread mixture evenly over top of cheesecake. Return to oven for 10 minutes. Remove and cool on rack for 30 minutes, then transfer to the fridge until fully chilled (at least 5 hours).
- To remove from pan: Open sides of pan and remove the strips of parchment paper. Place plastic wrap or parchment paper atop cheesecake. Invert cake onto a cake board, a large, flat plate, or a pan (careful there’s no rim that will dig in to the top if your cake). Remove bottom of pan and the round of parchment paper. Revert cheesecake onto a fresh board or platter. If desired, clean up the side of the cake by running a palette knife or spatula around the edge
- Serve cheesecake as is, or with fresh fruit, berries, chocolate, fruit purees, whipped cream, or other garnish of your choosing.

Image from Briana Goodall.