 Get self-health education, nutrition resources, and a FREE copy of A Terrible Ten: Health Foods That Ain't ebook.
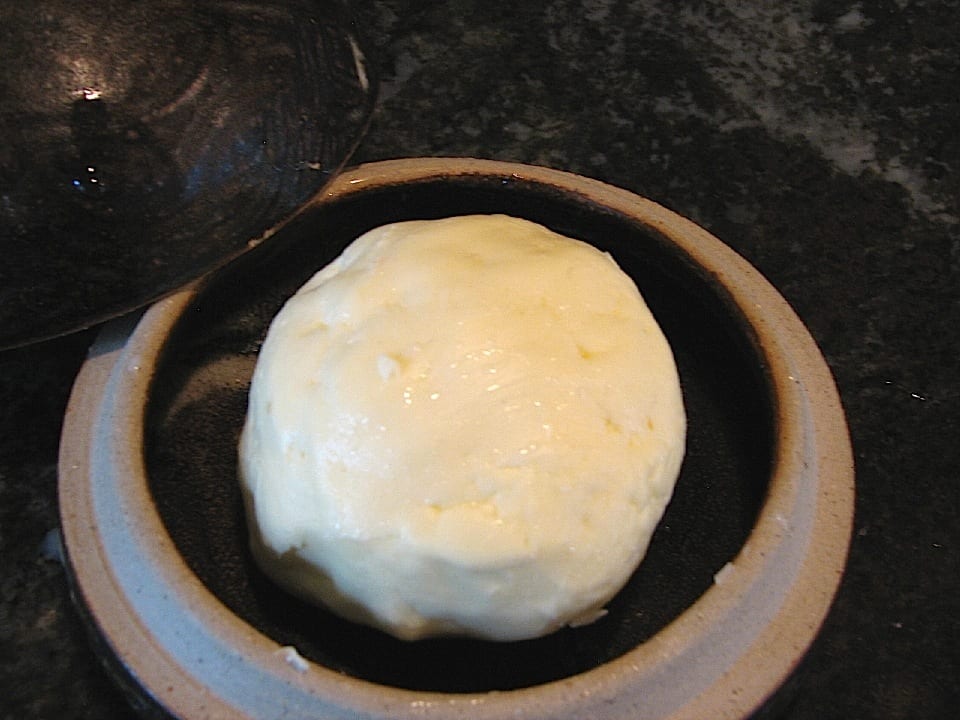
Ask Chef Phyllis:
Will the butter I make from raw cream spoil? It has an unfamiliar odor that I’m not sure I like. Is it bad or unsafe to use?
—Joanna Lynch, Colorado Springs, CO
No, the butter is good and usable. Many homemade butter makers let the cream sour before turning it into butter. In Nourishing Traditions, Sally Fallon recommends leaving fresh raw cream at room temperature for eight hours or so to sour; this process is called “culturing.” Culturing is only recommended for raw milk or cream products because these will sour but not go bad like pasteurized store-bought milk. In some countries they prefer the flavor produced by culturing, but it is more pronounced. If you’ve only eaten store-bought butter, this more distinct flavor may taste unfamiliar. See below for how to make butter without souring it first.
On the farm, batches of cream are saved in a cool place until there’s enough cream to take on the time-consuming job of churning. You might be familiar with the “Make Butter in a Jar” parlor game—nice if you have the time and the family members to do the shaking—which operates under the very same principle as churning it. Most everyone has seen a butter churn, a wooden dinosaur often sitting in the corner of an antique store. Inside this barrel is a paddle. Simple operation: pour cream skimmed from the top of chilled milk into the bottom of the churn, and then paddle away until you feel a difference in the paddle pressure or hear the slushing sound of liquid. A trained ear would know when the butter was complete by the sound alone.
The slushing by-product of all this churning is buttermilk. The fat globules (butter) stick together and form a mass, leaving behind a kind of whey—original buttermilk. Today, commercially produced buttermilk bears no resemblance to the original. But if you put real buttermilk (leftover from making butter) in the refrigerator, it gets thicker over time and makes a refreshing drink. I use leftover buttermilk for my sourdough bread starter, salad dressings, and in place of water in some of my soups.
Thanks to the food processor, making butter today is easy. All you need is ice-cold water and some good sea salt, and then it just takes a few easy steps. My friend Malina, who attends my cheese-making class, makes butter in the blender. This technique works well but takes a little longer.
Most Americans don’t like the flavor of sweet (unsalted) butter because it tastes flat to them. In fact, the United States, Great Britain, and Ireland are the only countries that enjoy salted butter. In other countries that use butter instead of oil, they prefer unsalted, also known as sweet cream butter. But with the addition of a little salt, the butter’s shelf life lengthens to a few weeks instead of just a few days.
Cultured Butter from Raw Cream
You can also skip the whey step and just go straight to making butter without it.
Ingredients
1 pint to 1 quart raw cream, left out to sour, then chilled
½ cup ice water
½ cup chilled whey water
½ to 1 teaspoon sea salt (less is better)
Special equipment: large food processor with steel blade
Instructions
1. Pour the chilled cream into the bowl of a large food processor fitted with a steel blade. Beat until it starts to resemble whipped cream. This takes about 10 minutes, so be patient. Now is the time to add the salt if you’re making salted butter. Less salt is favorable until you learn how much you like.


2. Continue beating until the cream starts to clear the bowl. Add a ¼ cup of the ice water and a ¼ cup of the chilled whey water. The ice water helps hasten the clabbering process, and the whey water preserves it. At this point, examine the butter. You should notice that it looks yellow in color and has the consistency you’re used to.


3. Carefully remove the butter from the bowl, knead it a few minutes, and pat it into a flat mass about an inch thick. Press out as much water as you can. The less water in butter, the less it will spatter when heated. Cut into desired bars, and wrap in waxed paper or place in a glass bowl for chilling.


Non-Cultured Butter
To make non-cultured butter, add about ¼ to a ½ cup of very cold whey (the liquid that’s left over from making fresh cheese or yogurt) to the food processor through the tube while the machine is running. The right time to add the whey to the cream is after it’s turned into whipping cream but not yet separated into butter and buttermilk. The scientific explanation is that the whey cultures convert sugars (lactose) in the cream or milk to produce lactic acid. This adds to the storage life of butter, and some say it makes it taste better—there’s no disagreeable smell, either.
About Whey and Butter Storage
If you’re an avid cheese and yogurt maker, you’ll always have a supply of whey. If not, you can order whey in powdered form from Standard Process to keep on hand. In a small jar, add one tablespoon whey powder to one cup water. This can be refrigerated for several weeks. When added at the correct time, whey water will preserve the butter—just as whey preserves the homemade mayonnaise in Sally Fallon’s Nourishing Traditions.
Since butter picks up flavors from everything in your refrigerator, it should always be wrapped or covered. Newer refrigerators have special butter keepers in the door—a slightly warmer place. Back in the day, butter was formed into an egg shape (the size of duck eggs) and stored in whey water in the ice box. Homemakers didn’t worry about the shelf life; butter was a precious addition to one’s diet, and consumed quickly. Civil War General Stonewall Jackson once said to never give him buttered bread again because he didn’t believe how much he enjoyed it and thought it could become addictive. He was right. Pure butter is superb.
Another storage method is to keep small batches of wax-paper-wrapped butter in the freezer, removing only what you’d expect to use in a day. One quart of raw cream produces about one pound of butter. The down side to freezing butter is the loss of nutrients that are destroyed by high temperatures.
Tips on Uses for Butter
Finally, once you start making your own butter at home, you’ll discover that there’s no limit to the herbs, spices, and seasonings you can add to whip up everything from fruit butters to herbed butter sauces.
To make your own fruit butter spread, just add a teaspoon of your favorite jam or preserves to a ½ cup of soft butter. For our monthly ladies’ luncheon, my favorite is orange marmalade butter spread on date and nut bread tea sandwiches. You may also want to try apricot-peach flavored butter on whole-wheat walnut bread tea sandwiches—really good.
Making an herbed butter for steaks is as simple as blending a tablespoon of homemade pesto with half a cup of butter. To give chicken breasts a flavorful touch, mix in some minced garlic and paprika, or curry powder and cumin. Or try some butter with minced garlic and parsley for an instant spread for garlic bread. For a truly outstanding butter sauce, you can’t go wrong with the following recipes.
Béarnaise Butter Sauce for Steaks
Béarnaise Butter melts over hot grilled or broiled steaks and tastes like you really slaved (but you didn’t). Master this easy recipe for great reviews all summer.
Ingredients
6 tablespoon butter
3 tablespoons fresh tarragon leaves, finely chopped, or 1½ teaspoons dried
1 shallot, finely chopped
1 clove garlic, finely minced
½ teaspoon each of sea salt and fresh ground black pepper
1 tablespoon fresh lemon juice, or to taste
Instructions
1. Using a fork, mash the butter, fresh or dried tarragon, shallot, garlic, sea salt, and ground black pepper.
2. Add the lemon juice and mix well.
3. Lay out a piece of wax paper and place the butter in the middle, forming a log. Roll it evenly. Tie the end up and chill for an hour.
4. After grilling the steaks, slice ½-inch to ¾-inches off the log and place it on the hot steak to melt. Serve immediately.
Blue Cheese Compound Butter for Burgers, Steaks, or Grilled Vegetables
A surefire hit for a barbecue, this recipe makes enough for two 9-inch logs.
Ingredients
¾ pound butter
2 tablespoons Dijon mustard
1 sprig of fresh thyme, minced, or 1 teaspoon dried
½ teaspoon sea salt
½ pound blue cheese (I use Danish Blue or Stilton Blue)
Instructions
1. Bring the butter to room temperature.
2. In an small mixing bowl, mash the butter, mustard, thyme, sea salt, and blue cheese together with a spatula and mix well. Taste the compound butter and correct salt as needed.
4. Lay out two sheets of wax paper. Form two 9-inch logs about 1½-inches in diameter. Roll up and tie the ends, then wrap in plastic wrap or foil.
5. Refrigerate until the butter and blue cheese harden, at least an hour. If desired, freeze one log for future use.
7. Serve ½-inch to ¾-inch slices on hot grilled burgers, steaks, or grilled vegetables.
However you flavor or use your homemade butter, you should be reassured to know that any butter you produce at home will be nutritionally superior to store-bought butter, and also preservative free.

AUTHOR’S NOTE
To choose your organically grown and fresh ingredients wisely, use the following criteria:
·chemical- and hormone-free meat
·wild-caught fish
·pastured-raised, organic eggs
·whole, unrefined grains
·virgin, unrefined, first-press organic oils
·whole-food, unrefined sweeteners
·pure, clean, spring water
·sea salt
·raw and/or cultured milk and cream products
Phyllis Quinn is a chef, food writer, and founder of Udderly Cultured, a class that teaches how to make homemade fresh mozzarella, butter, yogurt, cottage cheese, and other cultured products. Private lessons are available. For a reservation, call Phyllis at 970-221-5556 or email her at phyllisquinn2@gmail.com. Rediscover nearly lost cooking methods and get one-of-a-kind recipes in her books The Slow Cook Gourmet and Udderly Cultured: The Art of Milk Fermentation.
Products by Phyllis Quinn
All Books

Related Topics
healthy recipes | whole food nutrition | whole food recipes